In AX2012 or AX 2009 we directly write code on existing number sequence class but in AX (7) new version need to create new class and required extend to NumberSeqApplicationModule and required delegate method for mapping.
1. Create EDT ChangeId.
2. Add EDT to Table ChangeLog.
3. Create new Table method numRefChangeId().
public class ChangeLog extends common
{
static NumberSequenceReference numRefChangeId()
{
return NumberSeqReference::findReference(extendedTypeNum(ChangeId));
}
}
4. Create New Class NumberSeqModuleRisk and extend NumberSeqApplicationModule and a delegate method.
1. Create EDT ChangeId.
2. Add EDT to Table ChangeLog.
3. Create new Table method numRefChangeId().
public class ChangeLog extends common
{
static NumberSequenceReference numRefChangeId()
{
return NumberSeqReference::findReference(extendedTypeNum(ChangeId));
}
}
4. Create New Class NumberSeqModuleRisk and extend NumberSeqApplicationModule and a delegate method.
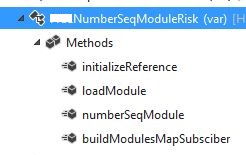
lass NumberSeqModuleRisk extends NumberSeqApplicationModule
{
public void initializeReference(NumberSequenceReference _reference,
NumberSeqDatatype _datatype, NumberSeqScope _scope)
{
#ISOCountryRegionCodes
super(_reference, _datatype, _scope);
switch (_datatype.parmDatatypeId())
{
case extendedTypeNum(ChangeId):
if("USA")
{
_reference.AllowSameAs = true;
}
/*if (SysCountryRegionCode::isLegalEntityInCountryRegion([#isoIT]))
{
_reference.AllowSameAs = true;
}*/
}
}
protected void loadModule()
{
NumberSeqDatatype datatype = NumberSeqDatatype::construct();
datatype.parmDatatypeId(extendedTypeNum(ChangeId));
datatype.parmReferenceHelp(literalStr("Creating new ChangeId"));
datatype.parmWizardIsManual(NoYes::No);
datatype.parmWizardIsChangeDownAllowed(NoYes::No);
datatype.parmWizardIsChangeUpAllowed(NoYes::No);
datatype.parmWizardHighest(999999);
datatype.parmSortField(1);
datatype.addParameterType(NumberSeqParameterType::DataArea, true, false);
this.create(datatype);
}
public NumberSeqModule numberSeqModule()
{
return NumberSeqModule::Proj;
}
[SubscribesTo(classstr(NumberSeqGlobal),delegatestr(NumberSeqGlobal,buildModulesMapDelegate))]
static void buildModulesMapSubsciber(Map numberSeqModuleNamesMap)
{
NumberSeqGlobal::addModuleToMap(classnum(NumberSeqModuleRisk), numberSeqModuleNamesMap);
}
}
5. Write a job and run that
static void ChangeId(Args _args)
{
NumberSeqModuleRisk numberSeqModuleRisk = new NumberSeqModuleRisk ();
numberSeqModuleRisk .load();
}
6. Then run the wizard Organization Administration -> CommonForms -> Numbersequences -> Numbersequences -> Generate -> run the wizard.
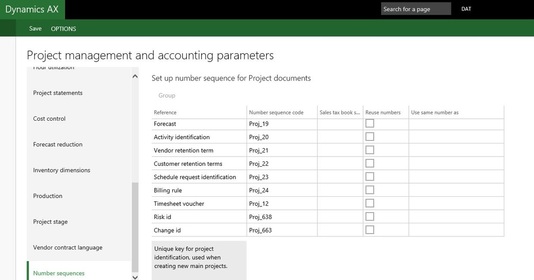
GO to Project management module -> setup -> Project management parameters form -> Num Seq
{
public void initializeReference(NumberSequenceReference _reference,
NumberSeqDatatype _datatype, NumberSeqScope _scope)
{
#ISOCountryRegionCodes
super(_reference, _datatype, _scope);
switch (_datatype.parmDatatypeId())
{
case extendedTypeNum(ChangeId):
if("USA")
{
_reference.AllowSameAs = true;
}
/*if (SysCountryRegionCode::isLegalEntityInCountryRegion([#isoIT]))
{
_reference.AllowSameAs = true;
}*/
}
}
protected void loadModule()
{
NumberSeqDatatype datatype = NumberSeqDatatype::construct();
datatype.parmDatatypeId(extendedTypeNum(ChangeId));
datatype.parmReferenceHelp(literalStr("Creating new ChangeId"));
datatype.parmWizardIsManual(NoYes::No);
datatype.parmWizardIsChangeDownAllowed(NoYes::No);
datatype.parmWizardIsChangeUpAllowed(NoYes::No);
datatype.parmWizardHighest(999999);
datatype.parmSortField(1);
datatype.addParameterType(NumberSeqParameterType::DataArea, true, false);
this.create(datatype);
}
public NumberSeqModule numberSeqModule()
{
return NumberSeqModule::Proj;
}
[SubscribesTo(classstr(NumberSeqGlobal),delegatestr(NumberSeqGlobal,buildModulesMapDelegate))]
static void buildModulesMapSubsciber(Map numberSeqModuleNamesMap)
{
NumberSeqGlobal::addModuleToMap(classnum(NumberSeqModuleRisk), numberSeqModuleNamesMap);
}
}
5. Write a job and run that
static void ChangeId(Args _args)
{
NumberSeqModuleRisk numberSeqModuleRisk = new NumberSeqModuleRisk ();
numberSeqModuleRisk .load();
}
6. Then run the wizard Organization Administration -> CommonForms -> Numbersequences -> Numbersequences -> Generate -> run the wizard.
GO to Project management module -> setup -> Project management parameters form -> Num Seq
7. Now create methods as shown on Form below.
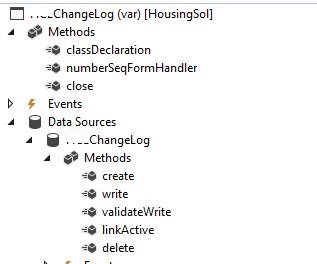
[Form]
public class ChangeLog extends FormRun
{
NumberSeqFormHandler numberSeqFormHandler;
/// <summary>
///
/// </summary>
NumberSeqFormHandler numberSeqFormHandler()
{
if (!numberSeqFormHandler)
{
numberSeqFormHandler=NumberSeqFormHandler::newForm(ChangeLog::numRefChangeId().NumberSequenceId, element, ChangeLog_DS, fieldNum(ChangeLog, ChangeId));
}
return numberSeqFormHandler;
}
public void close()
{
if (numberSeqFormHandler)
{
numberSeqFormHandler.formMethodClose();
}
super();
}
[DataSource]
class ChangeLog
{
public void create(boolean _append = false,
boolean _extern = false)
{
element.numberSeqFormHandler().formMethodDataSourceCreatePre();
super(_append);
if (!_extern)
{
element.numberSeqFormHandler().formMethodDataSourceCreate(true);
}
public void write()
{
super();
element.numberSeqFormHandler().formMethodDataSourceWrite();
}
public boolean validateWrite()
{
boolean ret;
ret = super();
ret = element.numberSeqFormHandler().formMethodDataSourceValidateWrite(ret) && ret;
if (ret)
{
ChangeLog.validateWrite();
}
return ret;
}
public void linkActive()
{
element.numberSeqFormHandler().formMethodDataSourceLinkActive();
super();
}
public void delete()
{
element.numberSeqFormHandler().formMethodDataSourceDelete();
super();
}
}
}
Now our custom number sequence is generated. Open your Form and check Num Seq by creating new record on your filed.
Reference: https://community.dynamics.com/ax/b/daxseed/archive/2016/11/17/ax-7-custom-number-sequence
public class ChangeLog extends FormRun
{
NumberSeqFormHandler numberSeqFormHandler;
/// <summary>
///
/// </summary>
NumberSeqFormHandler numberSeqFormHandler()
{
if (!numberSeqFormHandler)
{
numberSeqFormHandler=NumberSeqFormHandler::newForm(ChangeLog::numRefChangeId().NumberSequenceId, element, ChangeLog_DS, fieldNum(ChangeLog, ChangeId));
}
return numberSeqFormHandler;
}
public void close()
{
if (numberSeqFormHandler)
{
numberSeqFormHandler.formMethodClose();
}
super();
}
[DataSource]
class ChangeLog
{
public void create(boolean _append = false,
boolean _extern = false)
{
element.numberSeqFormHandler().formMethodDataSourceCreatePre();
super(_append);
if (!_extern)
{
element.numberSeqFormHandler().formMethodDataSourceCreate(true);
}
public void write()
{
super();
element.numberSeqFormHandler().formMethodDataSourceWrite();
}
public boolean validateWrite()
{
boolean ret;
ret = super();
ret = element.numberSeqFormHandler().formMethodDataSourceValidateWrite(ret) && ret;
if (ret)
{
ChangeLog.validateWrite();
}
return ret;
}
public void linkActive()
{
element.numberSeqFormHandler().formMethodDataSourceLinkActive();
super();
}
public void delete()
{
element.numberSeqFormHandler().formMethodDataSourceDelete();
super();
}
}
}
Now our custom number sequence is generated. Open your Form and check Num Seq by creating new record on your filed.
Reference: https://community.dynamics.com/ax/b/daxseed/archive/2016/11/17/ax-7-custom-number-sequence